To outline or not to outline
If you are looking to start a quarrel (or at least a passionate debate) in an MFA creative writing program, the topic of outlining is a winner every time. Having never taken an creative writing class or alas, even majored in English, I came to the debate late in the game and without a horse in the race. I believe that in the end each writer finds her own way, and no one system works for every writer. That said I think I have finally hit upon an outlining strategy that works well for me. I think of it as the Retrospective Outline. I’ve always intuitively resisted the initial outline as stifling but I know that sooner or later the structure of story needs attention, so I’ve taken to doing the outline after a full first draft is finished.
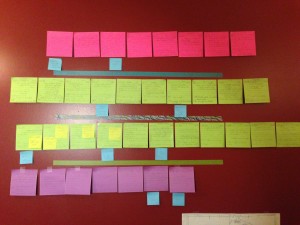
I finished a draft right before Christmas. It’s a story I’ve been working on for a while. Like a lot of writers I’ve heard from over the years, I’m better at beginnings and endings than middles. It’s very easy to lose focus in the middle and either write more scenes than you really need or not quite enough leaving gaps in the narrative. A friend recommended the screenwriting book Save the Cat and since I hope to write a screenplay in the next few months I thought I’d give it a try. Screenwriter Blake Snyder is a big advocate of laying out an entire movie in scenes, a note card for each scene. The scenes are put on a cork board, a row of cards for each of three acts, and rearranged or discarded as necessary. I was a bit skeptical at first but my studio has a lovely long empty wall painted in my favorite shade of red, so I gave it a try using post-it notes.
Drama in 3 Acts!

When I first laid out my scenes it became immediately obvious that the second half of the second act was where the trouble resided. All the other sections had 7 to 10 scenes and the second half of the the second act had 16 scenes. Aha!
Then once I had an idea of where to look I went through each scene with an eye to which ones had strong conflict, and propelled the main character forward. It became pretty obvious which scenes were just there to convey information, had no inherent conflict, and took the focus off my main character and his journey.
But wait there was vital information in those scenes–not so much drama but stuff you have to know! That’s the hard part of of trimming your work, not letting go of a perfectly good scene that doesn’t serve the plot, but figuring out what to do about the bits of information. I ended up putting the info on a smaller post-it and finding a different scene where I could weave it in. The best part about the process was learning that really in the 5 scenes I cut, I only had 4 vital pieces of story information that eventually found a home early in the second act.
Integrating the Visual elements of a story
This particular book has a visual element–completely new ground for me. I added smaller blue post-its for the scenes that have an illustration. In an earlier draft the first illustration didn’t come until mid-way through the second act. (Pink is act 1, green is the two halves of act 2, and purple is the 3rd act.) It was clear in looking at the book as a whole that the 12th scene was too long to wait for a visual so I found a way to put one in the 3rd scene of the story. But then as I was working a really strong idea came along for a final image at the very end of the story, so I decided to look for a way to put an echoing image in the first scene. The result (I hope) is a much more balanced story.
So there you have it! One method for outlining a story. Maybe not everyone’s cup of tea but it helped me trim about 6,000 words that were not doing my story any good.
If your new year’s resolutions happen to include writing a novel for kids or teens, I’ve got a class starting up at the Loft Literary center. My Vampire-Free Fiction class starts the 20th of this month. You can get lots more information here
